In today's digital age, remote IoT monitoring with Raspberry Pi has become an essential tool for businesses and individuals alike. It offers a cost-effective and efficient way to monitor various devices and systems from anywhere in the world. Whether you're managing a smart home, industrial equipment, or environmental sensors, this technology can significantly enhance your operational capabilities.
The concept of remote IoT monitoring involves connecting devices to the internet and collecting data in real-time. This allows users to access critical information about their systems remotely, enabling proactive decision-making and problem-solving. With the affordability and versatility of Raspberry Pi, it has become one of the most popular platforms for implementing IoT solutions.
As the demand for smart solutions continues to grow, understanding how to set up and manage remote IoT monitoring with Raspberry Pi is more important than ever. In this comprehensive guide, we will explore everything you need to know to get started, including the necessary hardware, software, and best practices to ensure a successful implementation.
Read also:Erome Your Ultimate Guide To Understanding And Exploring
Table of Contents
- Introduction to Remote IoT Monitoring with Raspberry Pi
- Raspberry Pi Basics
- Overview of IoT Technology
- Hardware Requirements for IoT Monitoring
- Setting Up the Software Environment
- Connecting Devices to Raspberry Pi
- Data Collection and Analysis
- Enabling Remote Access
- Implementing Security Measures
- Real-World Applications of Remote IoT Monitoring
- Troubleshooting Common Issues
- Conclusion
Introduction to Remote IoT Monitoring with Raspberry Pi
Why Use Raspberry Pi for IoT?
Raspberry Pi is a versatile and affordable single-board computer that has gained immense popularity in the field of IoT. Its compact size, low power consumption, and extensive community support make it an ideal choice for remote monitoring projects. By leveraging Raspberry Pi's capabilities, users can build robust IoT systems that provide real-time data insights.
One of the key advantages of using Raspberry Pi for IoT monitoring is its compatibility with a wide range of sensors and actuators. This flexibility allows for customization based on specific project requirements. Additionally, the availability of open-source software and libraries simplifies the development process, even for beginners.
Raspberry Pi Basics
Before diving into remote IoT monitoring, it's essential to understand the basics of Raspberry Pi. This section will cover the different models available, their specifications, and how to choose the right one for your project.
- Raspberry Pi Models: Learn about the latest models such as Raspberry Pi 4, Raspberry Pi Zero, and their respective features.
- Operating Systems: Explore popular operating systems like Raspbian, Ubuntu, and specialized IoT-focused OS options.
- Accessories: Discover essential accessories such as microSD cards, power supplies, and cooling solutions.
Overview of IoT Technology
What is IoT?
The Internet of Things (IoT) refers to the network of physical devices embedded with sensors, software, and connectivity, enabling them to exchange data with other devices and systems over the internet. IoT technology has revolutionized industries by providing unprecedented levels of automation and data-driven insights.
Remote IoT monitoring with Raspberry Pi combines the power of IoT with the flexibility of Raspberry Pi to create innovative solutions. From home automation to industrial process control, the possibilities are virtually limitless.
Hardware Requirements for IoT Monitoring
To set up a remote IoT monitoring system with Raspberry Pi, you'll need the following hardware components:
Read also:How To Manage A Fleet Of Raspberry Pi For Free A Comprehensive Guide
- Raspberry Pi board
- MicroSD card with pre-installed OS
- Power supply
- Sensors (e.g., temperature, humidity, motion detectors)
- Network adapter (Wi-Fi or Ethernet)
- Optional accessories like a camera module or display
Setting Up the Software Environment
Installing the Operating System
The first step in setting up your Raspberry Pi for remote IoT monitoring is installing the appropriate operating system. Raspbian is a popular choice due to its ease of use and extensive support for IoT applications. Follow these steps to install the OS:
- Download the latest version of Raspbian from the official website.
- Use a tool like Etcher to flash the image onto your microSD card.
- Insert the microSD card into your Raspberry Pi and power it on.
Connecting Devices to Raspberry Pi
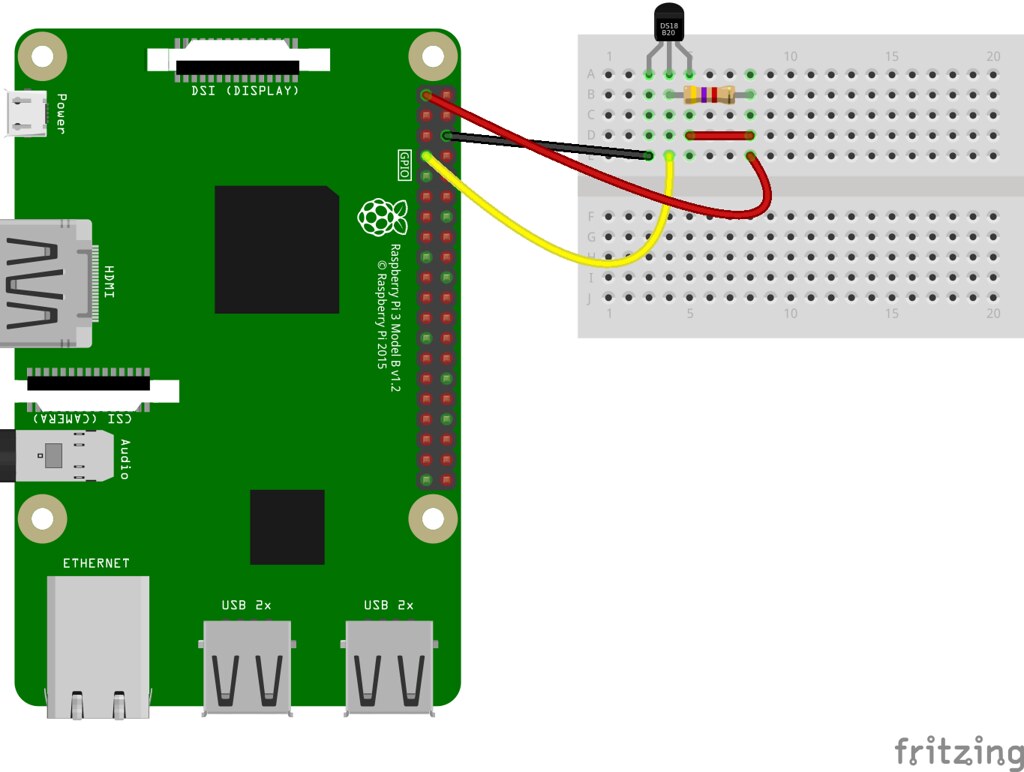
Once your Raspberry Pi is set up, the next step is connecting the necessary devices and sensors. This involves wiring the sensors to the GPIO pins and configuring the software to read data from them. Refer to the datasheets of your specific sensors for detailed instructions.
Data Collection and Analysis
Using Python for Data Processing
Python is one of the most popular programming languages for IoT applications due to its simplicity and powerful libraries. Use Python to collect data from sensors and perform real-time analysis. Some useful libraries include:
- RPi.GPIO for GPIO pin control
- Adafruit_DHT for interfacing with DHT sensors
- Matplotlib for data visualization
Enabling Remote Access
To enable remote access to your Raspberry Pi, you can use tools like SSH (Secure Shell) and VNC (Virtual Network Computing). These tools allow you to control your Raspberry Pi remotely from any device with an internet connection. Additionally, consider setting up a web server to display real-time data on a dashboard.
Implementing Security Measures
Best Practices for Securing Your IoT System
Security is a critical aspect of remote IoT monitoring. Follow these best practices to protect your system:
- Change default passwords and use strong, unique credentials.
- Enable firewalls and configure network settings to restrict unauthorized access.
- Regularly update the operating system and software to patch vulnerabilities.
- Encrypt data transmissions using protocols like HTTPS or SSL.
Real-World Applications of Remote IoT Monitoring
Remote IoT monitoring with Raspberry Pi has numerous applications across various industries. Some examples include:
- Smart home automation for energy efficiency and convenience.
- Industrial process control for monitoring machinery and optimizing production.
- Environmental monitoring for tracking air quality, water levels, and weather conditions.
- Agriculture for precision farming and livestock management.
Troubleshooting Common Issues
Even with careful planning, issues may arise during the setup and operation of your remote IoT monitoring system. Here are some common problems and their solutions:
- No internet connectivity: Check network settings and ensure proper wiring.
- Sensor not working: Verify sensor connections and calibrate if necessary.
- Slow performance: Optimize code and free up system resources.
Conclusion
Remote IoT monitoring with Raspberry Pi offers a powerful and flexible solution for managing devices and systems remotely. By following the steps outlined in this guide, you can successfully implement a robust IoT system that provides valuable insights and enhances operational efficiency.
We encourage you to share your thoughts and experiences in the comments section below. If you found this article helpful, consider sharing it with others who may benefit from it. For more in-depth guides and tutorials, explore our other resources on our website.
Remember, staying informed and continuously improving your skills is key to mastering remote IoT monitoring with Raspberry Pi. Happy building!